


With baseball season about ¾ of the way through I felt he need to address the rope-like strands that have been stylishly gracing the fields for sometime now. The Phiten Rope Necklace, twisted around many stars’ necks, a thickly braided and variously colored rope which makes claim to reduce fatigue and speed up recovery after hard workouts and intense competitions. After doing a bit of my own research as to how and why these titanium-laden ropes are responsible for the transfer of so called healing powers I have come to find out that this MLB neckwear hype is just that… a hype and has come up short on the science end of things. There are no concrete studies to back up the claims that these ropes will enhance performance, and the Food and Drug Administration has not recognized them as having any therapeutic value.
Phiten, maker of the official "Phiten rope necklace" explains them as follows on MLB.com:
"We have a really unique product. It has the effect to stabilize your electric current inside the body. Every single product has been permeated with what we call the aqua titanium. We have technology to dissolve the metal into the water. That specially treated titanium allows the flow of energy."
So while some big-hitting baseball stars swear by them, there is still NO solid supporting science behind them. In turn, knowing how notoriously ritualistic athletes are, I’m going to have to say that the superstitious nature of our sporting elite may have gotten the better of them in regards to the Phiten rope. On another note, a note with a bit more scientific reasoning, a lucky charm, in this respect (the Phiten rope), however irrational it may seem, can undoubtedly affect the outcome of a task at hand. This is presumably because they have the ability to affect the mental state of the wearer. So be it your stinky socks you refuse to wash from the last game you won, the desire to keep a number you have been successful with in the past, or touting your Phiten rope whether it does anything or not, I AM a believer that the smallest lucky charm that has accompanied a player to the top of their game deserves a nod of respect.
But at upwards of $50 a pop, stay tuned for a DIY tutorial for your very own Phiten Braided Rope! HA!

{Josh Becett... Phiten Energy Source or Head Shop Hemp Necklace... hmmm}

{New York Yankees' A.J. Burnett too bad his rope isnt a stress reliever as well }

{Texas Rangers' Mitch Moreland's Phiten necklace couldnt help him from striking out...}

{Joba Chamberlain... I heard they call him Joba Wacky?}

{Curt Schilling, Phiten rope... ? Maybe just a lucky charm}

{Professional badminton player, Lu Lan wearing his Phiten! Ummm... pretty much Amazingness} Hehe

Best Friends Forever...
August 12, 2011


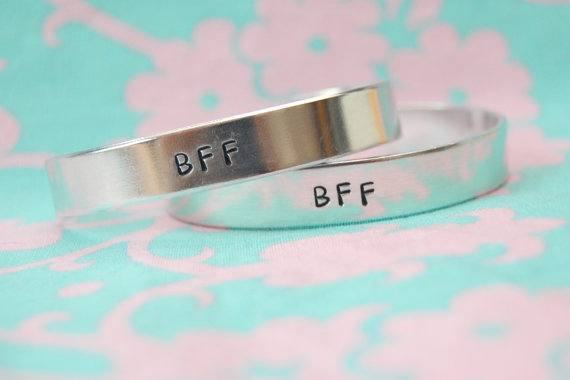
OK – so it totally goes without saying that I am a pretty big fan of accessories. And secondly, after getting a late night text from one of my long distance besties, it got me thinking of how big of a fan I am and always have been of best friends! Good girlfriends are few and far between and I have been what I feel is not only lucky enough, but blessed, to say the least, to have some of the best girl friends that really live up to the term best friends. To me the term best friends really means something… it means that through thick and thin you fight and that when times get bad you are there for one another… there is a level of mutual compassion and in general kindheartedness. Which brings me back to accessories, being a big fan of best friends and an accessory lover of all sorts; I of course love best friend jewelry! So today im paying a bit of tribute to good old throwback elementary school style, with some of my favorite best friends forever jewels! The selection of matching bracelets, necklaces and even rings are so much fun these days as they far exceeded that classic broken heart necklace. I have included my most lust worthy faves of cute ways to show some BFF pride!



Show Me Your Rings Wednesday! Anything Goes Edition
August 3, 2011


So Roped In: Honestly WTF's DIY
August 2, 2011


Supplies You Will Need:
- a little over 2 feet of 2mm accessory or utility cord (you can also use twine, mason line or any cord)- a 7/8″ brass S hook
- a pair of pliers
- a lighter

-Before you begin, seal the tips of the cord by burning them with a lighter. This will prevent the cord from fraying as you work.
-With a pair of flat nose pliers, squeeze one side of the S hook until it is completely closed. Do the same to the other side but leave just enough room for the cord to slip through.
-Thread 6 inches of cord through the closed side of the hook. Fold 3 inches of cord back on itself, creating a zig zag.
-Bend the last 2 inches of the cord over the zig zag.

-Coil the cord twice around towards the left loop.
-Push the tip through the opening of the left loop.
-While pinching the tip with your left fingers, use your right fingers and push the coil to the left until the loop is closed and the knot is tight. Test the adjustable knot by sliding it towards the base of the S hook.

Repeat the same steps on the other side. This time, coiling towards the right side and pushing the coil in the same direction.
-Trim and re-burn the tips if necessary.
Your wrap bracelet is finished!
-It can be wrapped around the wrist 2-3 times and adjusted with the sliding knots.
 and Voila! Enjoy!!!!!!
-Trim and re-burn the tips if necessary.
Your wrap bracelet is finished!
-It can be wrapped around the wrist 2-3 times and adjusted with the sliding knots.

Subscribe to:
Posts (Atom)


Social Icons